

![]()
Paste Tools: Several tools for pasting information from the Clipboard as enhanced meta-files. (video overview)
![]() Paste, Size and Centre: Pastes the contents from the clip board and sizes the result to fit the slide and centres it. Smaller shapes are made larger and larger shapes made smaller. Useful when pasting a screen shot that is larger than the slide.
Paste, Size and Centre: Pastes the contents from the clip board and sizes the result to fit the slide and centres it. Smaller shapes are made larger and larger shapes made smaller. Useful when pasting a screen shot that is larger than the slide.

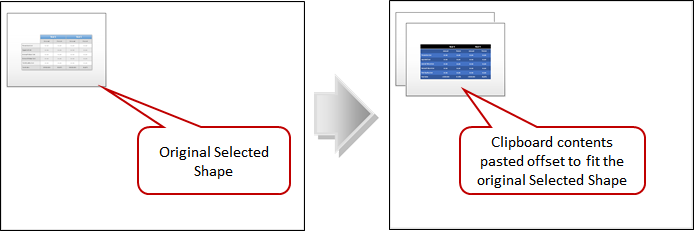
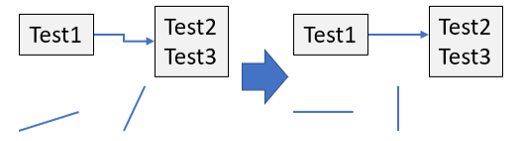
![]() Paste Offset: Pastes the contents from the clipboard to fit the selected shape’s height or width based on the ratio – with an offset. The dimensions are constrained by the ratios between the height and width of the original shape and the height and width of the clipboard content. The clipboard contents are pasted as an enhanced meta file.
Paste Offset: Pastes the contents from the clipboard to fit the selected shape’s height or width based on the ratio – with an offset. The dimensions are constrained by the ratios between the height and width of the original shape and the height and width of the clipboard content. The clipboard contents are pasted as an enhanced meta file.
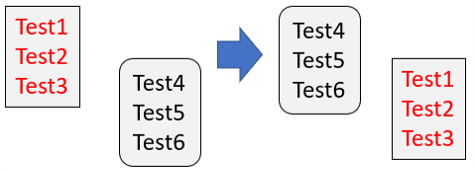
![]() Paste Replace: Pastes the contents from the clipboard to fit the selected shape’s height or width based on the ratio and deletes the original shape – effectively replacing the original shape. The dimensions are constrained by the ratios between the height and width of the original shape and the height and width of the clipboard content. The clipboard contents are pasted as an enhanced meta file.
Paste Replace: Pastes the contents from the clipboard to fit the selected shape’s height or width based on the ratio and deletes the original shape – effectively replacing the original shape. The dimensions are constrained by the ratios between the height and width of the original shape and the height and width of the clipboard content. The clipboard contents are pasted as an enhanced meta file.
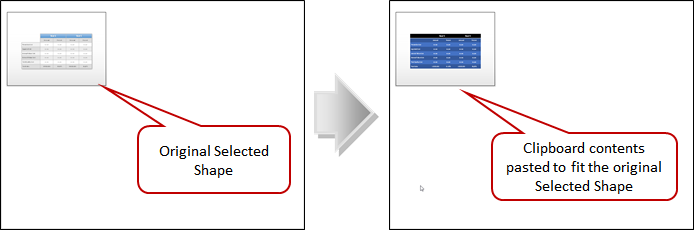
![]() Paste To Size: Pastes the contents from the clipboard to fit the selected region. The dimensions are constrained by the ratios between the height and width of the region and the height and width of the clipboard content. The clipboard contents are pasted as an enhanced meta file.
Paste To Size: Pastes the contents from the clipboard to fit the selected region. The dimensions are constrained by the ratios between the height and width of the region and the height and width of the clipboard content. The clipboard contents are pasted as an enhanced meta file.
Slide Tools: A series of tools related to Slides including printing and saving. (video overview)
![]() Slide Library: Inserts a slide chosen by the user from the Slide Library. Slide Library presentations consist of one slide. The Slide Library is installed in the Documents folder. Users can use the Library to store their own slides if they choose to do so. Note: it inserts the first slide from the chosen presentation. This will provide easy access to slides that are frequently used.
Slide Library: Inserts a slide chosen by the user from the Slide Library. Slide Library presentations consist of one slide. The Slide Library is installed in the Documents folder. Users can use the Library to store their own slides if they choose to do so. Note: it inserts the first slide from the chosen presentation. This will provide easy access to slides that are frequently used.
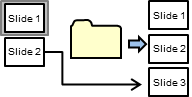
![]() Consolidate Slides: Adds a Slide to the end of the Presentation and pastes images of the Selected Slides on it. They will be tiled if there are fewer than 5 slides selected. Otherwise, the images will be cascaded. Users are asked if they want the slides consolidated as Metafile or PNG images. Generally, the metafile option provides the best quality for mixed content (text & images). For slides with mostly charts, PNG may provide a better result. Note: the User must be in Normal Slide view to run this macro.
Consolidate Slides: Adds a Slide to the end of the Presentation and pastes images of the Selected Slides on it. They will be tiled if there are fewer than 5 slides selected. Otherwise, the images will be cascaded. Users are asked if they want the slides consolidated as Metafile or PNG images. Generally, the metafile option provides the best quality for mixed content (text & images). For slides with mostly charts, PNG may provide a better result. Note: the User must be in Normal Slide view to run this macro.


![]() Insert Timeline Slide: Inserts a timeline slide with or without marker leader lines based on the user’s choice. The text auto-sizes to fit the text area. The marker colour can be changed. The text, marker and optional leader line are grouped together for easier positioning.
Insert Timeline Slide: Inserts a timeline slide with or without marker leader lines based on the user’s choice. The text auto-sizes to fit the text area. The marker colour can be changed. The text, marker and optional leader line are grouped together for easier positioning.

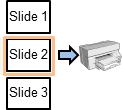
![]() Print Current Slide: Prints the currently selected slide.
Print Current Slide: Prints the currently selected slide.
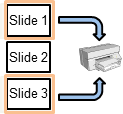
![]() Print Selected Slides:Prints the currently selected slides.
Print Selected Slides:Prints the currently selected slides.
![]() Save Selected Slides: Allows the creation of a new presentation from the selected slides. The user is prompted for a name and location.
Save Selected Slides: Allows the creation of a new presentation from the selected slides. The user is prompted for a name and location.

Misc Slide Tools
![]() Add Custom Text: Allows the User to apply a Custom Textbox to the bottom of each Slide Master. If it contains the words confidential, secret or classified, the text colour is set to Red.
Add Custom Text: Allows the User to apply a Custom Textbox to the bottom of each Slide Master. If it contains the words confidential, secret or classified, the text colour is set to Red.

![]() Delete All Hidden Slides: Deletes all hidden slides in the presentation.
Delete All Hidden Slides: Deletes all hidden slides in the presentation.

![]() Footer Off: Hides the footer elements (page number, date, etc…) on each slide.
Footer Off: Hides the footer elements (page number, date, etc…) on each slide.
![]() Footer On: Makes the footer visible on each slide based on the slide master.
Footer On: Makes the footer visible on each slide based on the slide master.
![]() Insert Table of Contents: Based on the selected Slides, inserts a new Slide with a list of the Slides’ titles. Hidden Slides are excluded. The number of columns and text size depend on the number of Slides selected.
Insert Table of Contents: Based on the selected Slides, inserts a new Slide with a list of the Slides’ titles. Hidden Slides are excluded. The number of columns and text size depend on the number of Slides selected.

![]() Selected Slides to End: Moves selected slides to the end of the presentation.
Selected Slides to End: Moves selected slides to the end of the presentation.

![]() Page Numbers – Add: does the following:
Page Numbers – Add: does the following:
- Turns off the slide numbers on each slide if they were created using PowerPoint’s slide number field in the Slide Masters
- Adds a textbox to each visible slide (right bottom corner) showing “page of pages” example 1 of 5. The numbers are sequential but skip the hidden slides. The total number of “pages” counts the number of visible slides.
NOTE: if slides are added, moved, deleted, made visible / hidden, the macro must be run again to “fix” the numbering.
![]() Page Numbers – Restore: does the following:
Page Numbers – Restore: does the following:
- Turns on the slide numbers on each slide if they were created using PowerPoint’s slide number field in the Slide Masters
- Deletes any of the page numbering text boxes created using the AddPageNumbers macro above.
NOTE: This makes the Slide Numbers visible based on the various slide masters contained in the presentation.
![]() Progress Bar On: Adds a thin green rectangle to each non-hidden slide which acts as a progress bar as the presentation is shown.
Progress Bar On: Adds a thin green rectangle to each non-hidden slide which acts as a progress bar as the presentation is shown.

![]() Progress Bar Off: Deletes the “Progress Bar” from each slide.
Progress Bar Off: Deletes the “Progress Bar” from each slide.

![]() Save to Slide Library: Saves the selected Slide to the Slide Library. The users can choose to add it to an existing folder or add a new folder of their choosing.
Save to Slide Library: Saves the selected Slide to the Slide Library. The users can choose to add it to an existing folder or add a new folder of their choosing.
![]() Split Selected Table: If the selected table extends past the bottom of the slide, it will be split across duplicate slides with the first row as the header.
Split Selected Table: If the selected table extends past the bottom of the slide, it will be split across duplicate slides with the first row as the header.

![]() Split Table at Row: the table will be split across duplicate slides at the current row. The first row will be used as a header.
Split Table at Row: the table will be split across duplicate slides at the current row. The first row will be used as a header.
![]() Toggle Hide / Unhide: Hides or un-hides the current slide while placing or removing a “Hidden Slide” text box from the slide.
Toggle Hide / Unhide: Hides or un-hides the current slide while placing or removing a “Hidden Slide” text box from the slide.
![]()
![]() Toggle Revise Stamp: On the current slide, places or removes a “Revise this slide” text box.
Toggle Revise Stamp: On the current slide, places or removes a “Revise this slide” text box.
Add Shapes (video overview)
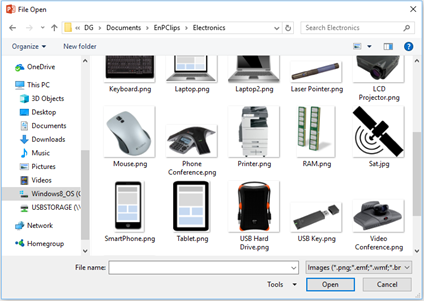
![]() EnP Clips: Allows the user to insert an images and Clip Art found in specific folders located in user’s documentsEnPClips folder. The user can add their own “favourite” images to the exiting folder(s) or add their own folder(s) to the user’s DocumentsEnPClips folder. EnP Tools comes with a few examples to get you started.
EnP Clips: Allows the user to insert an images and Clip Art found in specific folders located in user’s documentsEnPClips folder. The user can add their own “favourite” images to the exiting folder(s) or add their own folder(s) to the user’s DocumentsEnPClips folder. EnP Tools comes with a few examples to get you started.
Examples:
![]() Add Key Point: Adds a “Key Points:” textbox across the bottom of the current slide.
Add Key Point: Adds a “Key Points:” textbox across the bottom of the current slide.

Custom PowerPoint Shapes
There are 2 categories:
1) Misc Shapes
2) Progress Pies that can be used to report on the progress of a task or activity.
Misc Shapes
![]() Rounded Rectangle: Adds a red Rounded Rectangle that can be used to indicate focus areas.
Rounded Rectangle: Adds a red Rounded Rectangle that can be used to indicate focus areas.
![]()
![]() Callout: Adds a red Rounded Callout that can be used to indicate focus areas.
Callout: Adds a red Rounded Callout that can be used to indicate focus areas.

![]() Cross Over Connector – Horizontal
Cross Over Connector – Horizontal
![]() Cross Over Connector – Vertical: Adds a set of connectors that can be used in flow charts for cross overs. It adds 3 joined MS Office shapes – a straight connector, an arc and a straight line arrow. The straight connector and arrow are meant to be connected to the flow chart symbols. The arc is best moved with the keyboard arrow keys – up and down, side to side. The same connectors are available in Excel.
Cross Over Connector – Vertical: Adds a set of connectors that can be used in flow charts for cross overs. It adds 3 joined MS Office shapes – a straight connector, an arc and a straight line arrow. The straight connector and arrow are meant to be connected to the flow chart symbols. The arc is best moved with the keyboard arrow keys – up and down, side to side. The same connectors are available in Excel.

![]() Add Current Date: Adds the current date.
Add Current Date: Adds the current date.
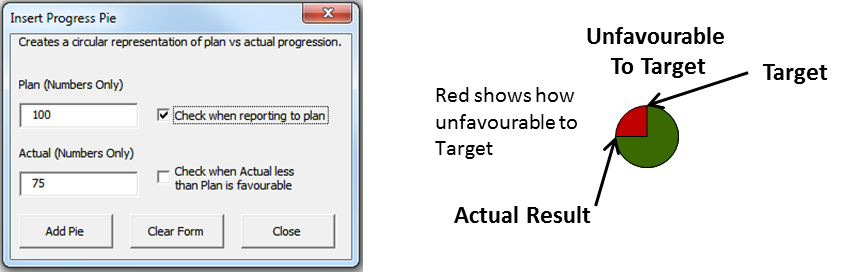
 Progress Pies that can be used to report on the progress of a task or activity. (placed on current slide bottom left)
Creates a circular representation of plan vs actual progression or result based on user input. It is added to the bottom left corner of the slide.
(Note: Targets with Zeros, Actuals with negative numbers can provide odd illustrations.)


 Yamataka Tools: A set of tools to help build Yamataka / Waterfall charts from simple rectangles:
![]() Add Shapes and Connectors: Displays the MS Office Autoshapes gallery. Right clicking on a shape and selecting “Lock Drawing Mode” will allow the User to draw multiple versions of the selected shape.
Add Shapes and Connectors: Displays the MS Office Autoshapes gallery. Right clicking on a shape and selecting “Lock Drawing Mode” will allow the User to draw multiple versions of the selected shape.
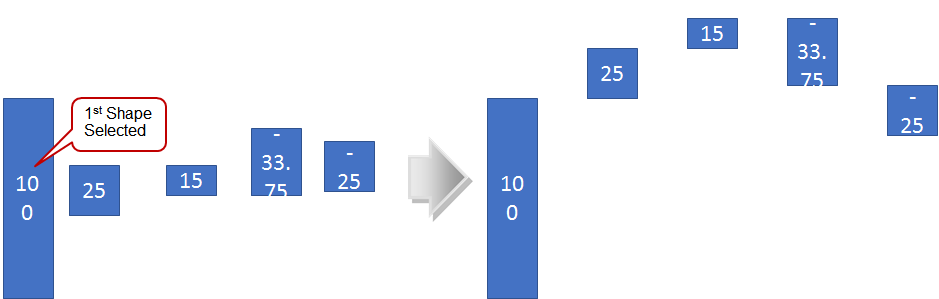
![]() Size Proportional: Proportionately sets the height of the selected shapes in relation to the height of the first selected shape and its text while setting the width to be the same as the first shape.
Size Proportional: Proportionately sets the height of the selected shapes in relation to the height of the first selected shape and its text while setting the width to be the same as the first shape.

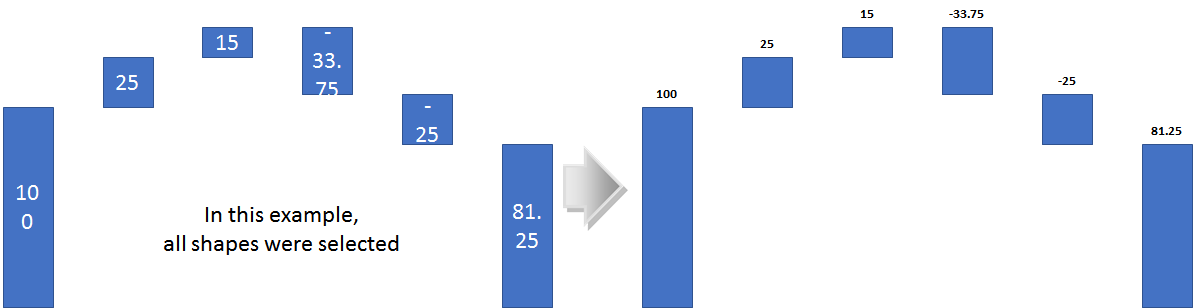
![]() Cascade: Arranges the selected shapes (beginning with the first selected shape) into the basic cascade arrangement of a Yamataka or Waterfall chart. It takes into account whether or not the values in the rectangles are positive or negative and aligns the shapes appropriately. It also horizontally spaces the shapes based on the width of the first shape.
Cascade: Arranges the selected shapes (beginning with the first selected shape) into the basic cascade arrangement of a Yamataka or Waterfall chart. It takes into account whether or not the values in the rectangles are positive or negative and aligns the shapes appropriately. It also horizontally spaces the shapes based on the width of the first shape.
![]() Add Summary Bar: Creates a rectangle with the sum of the values of the selected shapes as it’s text value, sets the height and width relative to the 1st selected shape then aligns it’s bottom to that shape.
Add Summary Bar: Creates a rectangle with the sum of the values of the selected shapes as it’s text value, sets the height and width relative to the 1st selected shape then aligns it’s bottom to that shape.

![]() Move Text Above: Creates a text box above the selected rectangle with the rectangle’s text and then deletes the original text in the rectangle.
Move Text Above: Creates a text box above the selected rectangle with the rectangle’s text and then deletes the original text in the rectangle.
Arrange and Modify Shapes: relating to working with various shape e.g. resizing, aligning etc… (video overview)
![]() Same Size: Adjusts the size of the selected Shapes to the size of the last selected Shape.
Same Size: Adjusts the size of the selected Shapes to the size of the last selected Shape.

![]() Same Height: Adjusts the height of the selected Shapes to the height of the last selected Shape.
Same Height: Adjusts the height of the selected Shapes to the height of the last selected Shape.

![]() Same Width: Adjusts the width of the selected Shapes to the width of the last selected Shape.
Same Width: Adjusts the width of the selected Shapes to the width of the last selected Shape.

![]() Bottom Edge Align: Aligns the top edge of the selected Shapes to the bottom edge of the last selected Shape.
Bottom Edge Align: Aligns the top edge of the selected Shapes to the bottom edge of the last selected Shape.

![]() Top Edge Align: Aligns the bottom edge of the selected Shapes to the top edge of the last selected Shape.
Top Edge Align: Aligns the bottom edge of the selected Shapes to the top edge of the last selected Shape.

![]() Right Edge Align: Aligns the left edge of the selected Shapes to the right edge of the last selected Shape.
Right Edge Align: Aligns the left edge of the selected Shapes to the right edge of the last selected Shape.

![]() Left Edge Align: Aligns the right edge of the selected Shapes to the left edge of the last selected Shape.
Left Edge Align: Aligns the right edge of the selected Shapes to the left edge of the last selected Shape.

![]() Spacing Vertical: Distributes the Selected Shapes, in order of Selection, below the Last Selected Shape by the number of Points entered.
Spacing Vertical: Distributes the Selected Shapes, in order of Selection, below the Last Selected Shape by the number of Points entered.

![]() Spacing Horizontal: Distributes the Selected Shapes, in order of Selection, to the right of the Last Selected Shape by the number of Points entered.
Spacing Horizontal: Distributes the Selected Shapes, in order of Selection, to the right of the Last Selected Shape by the number of Points entered.

Misc
![]() Arrange Selected Shapes: Arranges the Selected Shapes into a grid centered on the slide. Objects that cannot be grouped (tables, smart art, placeholders, etc…) should not be selected.
Arrange Selected Shapes: Arranges the Selected Shapes into a grid centered on the slide. Objects that cannot be grouped (tables, smart art, placeholders, etc…) should not be selected.

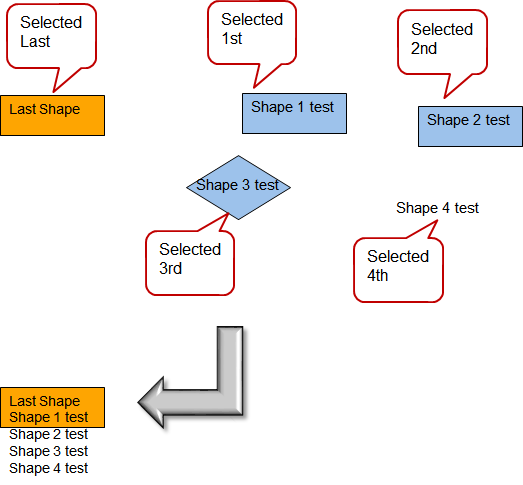
![]() Copy Shape to Slides: Copies the currently selected shape to each Slide in the presentation. To copy multiple Shapes, first group the Shapes and then use this function.
Copy Shape to Slides: Copies the currently selected shape to each Slide in the presentation. To copy multiple Shapes, first group the Shapes and then use this function.
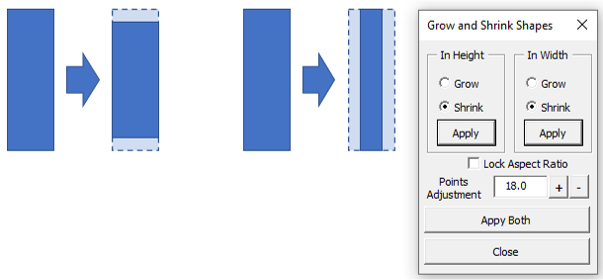
![]() Grow And Shrink: Expand and Contract the Selected Shapes along the non-rotated height and width axes.
Grow And Shrink: Expand and Contract the Selected Shapes along the non-rotated height and width axes.
![]() Line Snap: Makes the Selected Lines or Connectors horizontal or vertical based on their slope.
Line Snap: Makes the Selected Lines or Connectors horizontal or vertical based on their slope.
![]() Position Get: Gets the position of the selected shape. To be used in conjunction with the Set Position macro to match positions.
Position Get: Gets the position of the selected shape. To be used in conjunction with the Set Position macro to match positions.
![]() Position Set: Sets the position of the selected shape. To be used in conjunction with the Get Position macro to match positions.
Position Set: Sets the position of the selected shape. To be used in conjunction with the Get Position macro to match positions.
![]() Reset Aspect Ratio: Reset and lock the aspect ratio for all pictures in the presentation based on their height. Note: pictures will be resized.
Reset Aspect Ratio: Reset and lock the aspect ratio for all pictures in the presentation based on their height. Note: pictures will be resized.

![]() Size and Centre: Sizes the selected shape or picture to fit the slide and centres it. Smaller shapes are made larger and larger shapes made smaller. Useful when pasting a screen shot that is larger than the slide.
Size and Centre: Sizes the selected shape or picture to fit the slide and centres it. Smaller shapes are made larger and larger shapes made smaller. Useful when pasting a screen shot that is larger than the slide.
![]() Size Get: Gets the size of the selected shape. To be used in conjunction with the Size Set feature to match sizes.
Size Get: Gets the size of the selected shape. To be used in conjunction with the Size Set feature to match sizes.
![]() Size Set: Sets the size of the selected shape. To be used in conjunction with the Size Get feature to match sizes.
Size Set: Sets the size of the selected shape. To be used in conjunction with the Size Get feature to match sizes.
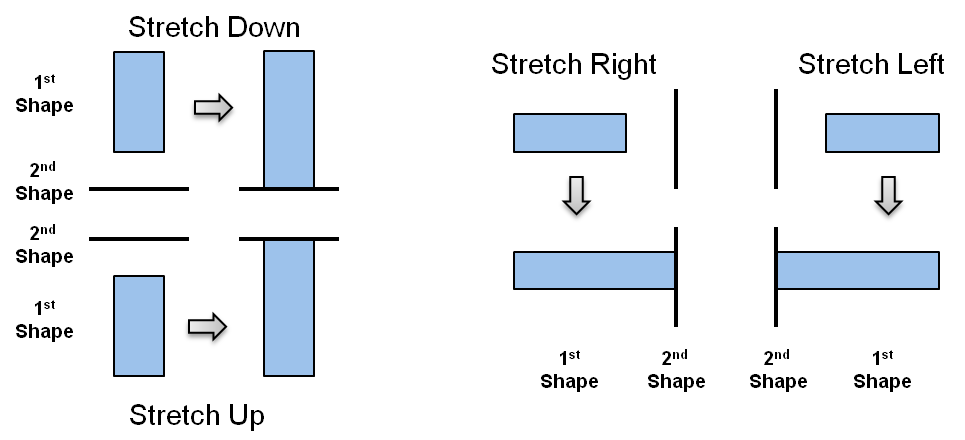
![]() Stretch Down: Stretches the bottom edge of the first of two selected shapes to the top edge of the second shape.
Stretch Down: Stretches the bottom edge of the first of two selected shapes to the top edge of the second shape.
![]() Stretch Up: Stretches the top edge of the first of two selected shapes to the bottom edge of the second shape.
Stretch Up: Stretches the top edge of the first of two selected shapes to the bottom edge of the second shape.
![]() Stretch Right: Stretches the right edge of the first of two selected shapes to the left edge of the second shape.
Stretch Right: Stretches the right edge of the first of two selected shapes to the left edge of the second shape.
![]() Stretch Left: Stretches the left edge of the first of two selected shapes to the right edge of the second shape.
Stretch Left: Stretches the left edge of the first of two selected shapes to the right edge of the second shape.
![]() Switch: Switches the Positions of the 2 Selected Shapes.
Switch: Switches the Positions of the 2 Selected Shapes.
![]() Table to Slide Width: Sizes the table width to fit the slide width and positions the top left corner onto the slide. If the table font size is less than 8, the font size is adjusted.
Table to Slide Width: Sizes the table width to fit the slide width and positions the top left corner onto the slide. If the table font size is less than 8, the font size is adjusted.
 Utilities: A number of misc tools including Picture Insert Tools. (video overview)
There are 2 categories:
1) Picture Insert Tools – Various tools to speed up the insertion and placement of pictures in a table as cell background.
2) Misc Tools
 Picture Insert Tools – Various tools to speed up the insertion and placement of pictures in a table as cell background.
![]() Insert Across a Table Row: Allows users to multi-select pictures to set as table cell backgrounds across a table row – split cells in a table will cause images to be skipped if added to non-split rows or columns
Insert Across a Table Row: Allows users to multi-select pictures to set as table cell backgrounds across a table row – split cells in a table will cause images to be skipped if added to non-split rows or columns
![]() Insert Down a Column: Allows users to multi-select pictures to set as table cell backgrounds down a table column – split cells in a table will cause images to be skipped if added to non-split rows or columns.
Insert Down a Column: Allows users to multi-select pictures to set as table cell backgrounds down a table column – split cells in a table will cause images to be skipped if added to non-split rows or columns.

![]() Insert Table: Inserts a table that can be used as a start point.
Insert Table: Inserts a table that can be used as a start point.
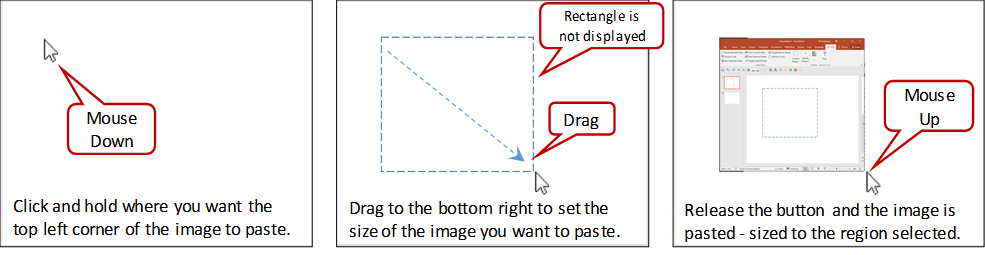
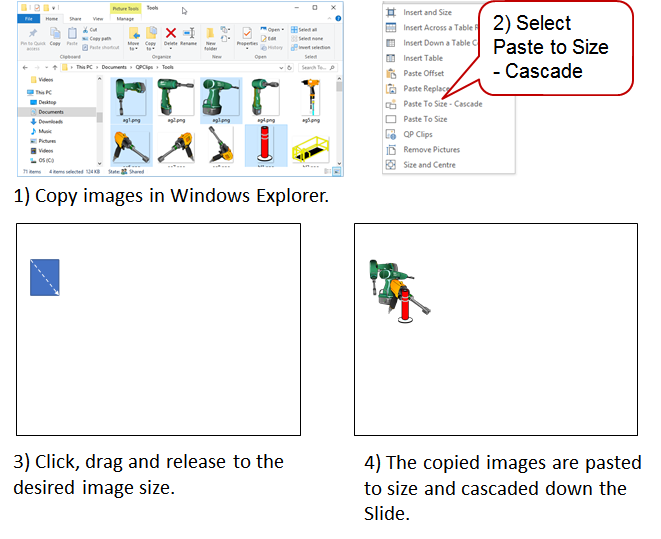
![]() Paste To Size – Cascade: Prior to clicking, the User copies images from Windows Explorer to the clipboard.This macro will paste the contents from the clipboard to fit a rectangle drawn by the user – cascading the results if multiple images have been copied. The resulting images can be moved individually or auto arranged using the EnP Tool – Arrange Selected Shapes found in the Misc Tools.
Paste To Size – Cascade: Prior to clicking, the User copies images from Windows Explorer to the clipboard.This macro will paste the contents from the clipboard to fit a rectangle drawn by the user – cascading the results if multiple images have been copied. The resulting images can be moved individually or auto arranged using the EnP Tool – Arrange Selected Shapes found in the Misc Tools.
![]() Remove Pictures: Eliminates any cell background images in a table while maintaining the style. Basically, erasing the pictures in the table.
Remove Pictures: Eliminates any cell background images in a table while maintaining the style. Basically, erasing the pictures in the table.
 Misc Tools
![]() Convert to PTC Template: Based on User input, converts a single slide to work with the EnP Tools Excel macro – Create a Problem Tracking Chart from Template. Essentially, this feature allows the user to convert any single slide presentation into a template that can be populated from any Excel sheet after it has been properly prepared by using the Prep PTC Sheet for PowerPoint Template in Excel. This is particularly useful for standard documents / blank masters.
Convert to PTC Template: Based on User input, converts a single slide to work with the EnP Tools Excel macro – Create a Problem Tracking Chart from Template. Essentially, this feature allows the user to convert any single slide presentation into a template that can be populated from any Excel sheet after it has been properly prepared by using the Prep PTC Sheet for PowerPoint Template in Excel. This is particularly useful for standard documents / blank masters.
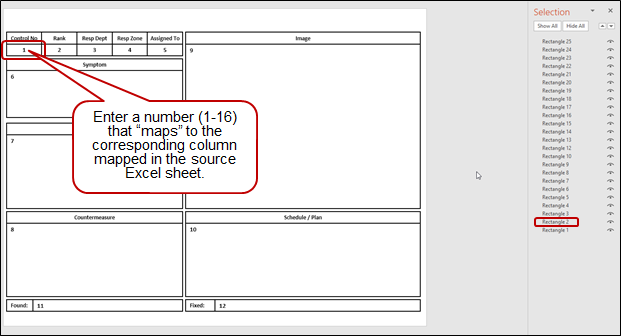
This tool works best with slides utilizing rectangles & textboxes. It is not intended for tables. The slide sh#Create_PTCapes’ text options must be set appropriately e.g. Shrink text on overflow, correct margins, alignment, etc… This tool does not change the existing formatting.
The user can “map” up to 16 fields from Excel to the Slide. The user must identify each shape to be mapped by entering a number between 1-16 as the text value of the shape. Though intended for a single slide presentation, other slides can be included; however, the “mapped” slide must be the first slide in the presentation.
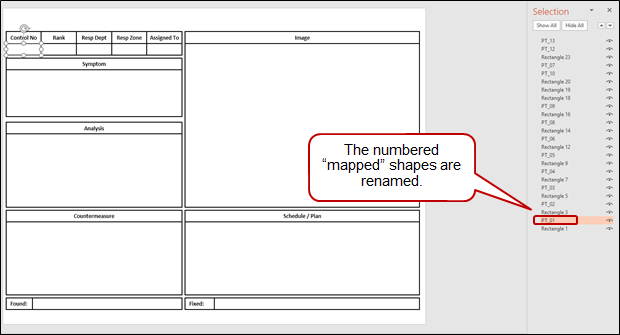
Running the macro will rename each of the identified shapes. The new names are used to identify where to paste the corresponding data from Excel. The slide is saved in the user’s Documents folder as Custom_EnP_PTC.pptx
Once created the slide can be populated from Excel using the Create a PTC from Template function in Excel.
Note: To create another template but keep an existing template, the user must manually rename the existing Custom_EnP_PTC.pptx e.g. Custom_EnP_PTC1.pptx and then go through the above process. The User can only use one template at a time.
![]() Copy Shapes to Slide Master: Copies the currently selected shapes to all Slide Masters in the active presentation. The selected shapes are cut from the presentation and pasted on the Slide Masters in the active presentation. New slides will now have those shapes displayed on them. This is useful for adding text such as control numbers to all slides and new slides.
Copy Shapes to Slide Master: Copies the currently selected shapes to all Slide Masters in the active presentation. The selected shapes are cut from the presentation and pasted on the Slide Masters in the active presentation. New slides will now have those shapes displayed on them. This is useful for adding text such as control numbers to all slides and new slides.
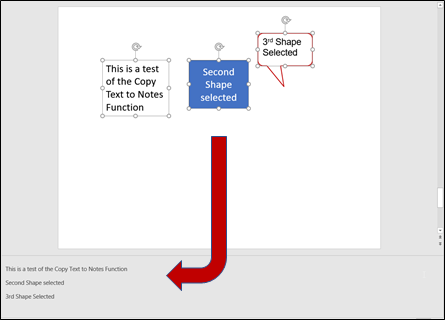
![]() Copy Text to Notes: Copies the text from the selected shapes to the Notes area in the order they are selected. Not intended for tables.
Copy Text to Notes: Copies the text from the selected shapes to the Notes area in the order they are selected. Not intended for tables.
![]() Cycle Fill Colours: Cycles the fill colours of the selected shapes through Light Blue, Dark Blue, Light Grey, Orange and White.
Cycle Fill Colours: Cycles the fill colours of the selected shapes through Light Blue, Dark Blue, Light Grey, Orange and White.
![]() Delete All Animation: Removes all animation from all slides in the presentation.
Delete All Animation: Removes all animation from all slides in the presentation.

![]() Delete Slide Master Shapes: Deletes Slide Master shapes added by EnP Tools in the active presentation. Essentially, this deletes any shapes in the active presentation’s Slide Master added using the Copy Shapes to Slide Master function above.
Delete Slide Master Shapes: Deletes Slide Master shapes added by EnP Tools in the active presentation. Essentially, this deletes any shapes in the active presentation’s Slide Master added using the Copy Shapes to Slide Master function above.
![]() Extract Tools: Tools to extract and save Media, Notes and Text from Presentations.
Extract Tools: Tools to extract and save Media, Notes and Text from Presentations.
![]() Extract Media to Folders: Extracts copies of the embedded image files and places them in folders. Windows Explorer is opened to the targeted folder.
Extract Media to Folders: Extracts copies of the embedded image files and places them in folders. Windows Explorer is opened to the targeted folder.

![]() Extract Notes: Combines all of the Presentation Notes onto a new slide at the end and exports them in a text file in the Presentation folder. The text is placed in a rectangle on the newly created last slide. If the Presentation has not been saved, the user will be prompted to Save before continuing. This is to ensure that the text file is placed in the same folder as the Presentation.
Extract Notes: Combines all of the Presentation Notes onto a new slide at the end and exports them in a text file in the Presentation folder. The text is placed in a rectangle on the newly created last slide. If the Presentation has not been saved, the user will be prompted to Save before continuing. This is to ensure that the text file is placed in the same folder as the Presentation.
e.g. TestFile – Presentation Notes 101042.txt
![]() Extract Text: Extracts the Presentation Text and exports it as a text file in the Presentation folder.
Extract Text: Extracts the Presentation Text and exports it as a text file in the Presentation folder.
e.g. TestFile – Presentation Text 101110.txt
![]() Extract To EnP Clips: Extracts the Selected Shapes to a folder with the Presentation name in the EnPClips – Shape Extracts folder. The extracted shapes are saved as Enhanced Metafile – EMF vector files.
Extract To EnP Clips: Extracts the Selected Shapes to a folder with the Presentation name in the EnPClips – Shape Extracts folder. The extracted shapes are saved as Enhanced Metafile – EMF vector files.
![]() Keep Shape Text: Keeps the Selected Shape’s Text as separate elements while deleting Lines and Fills.
Keep Shape Text: Keeps the Selected Shape’s Text as separate elements while deleting Lines and Fills.
![]() Keep Table Text: Keeps the Selected Table’s Text as separate elements while deleting Lines and Fills.
Keep Table Text: Keeps the Selected Table’s Text as separate elements while deleting Lines and Fills.

Filler Text Tools: Adds or saves Filler Text for use when designing Presentation Slides and Layouts. When saving Filler Text exclude the extension from the File Name. The text will be saved as a text file (.txt).

![]() Hide Shapes: Tools to hide and unhide shapes (circles, textboxes, tables, etc…) throughout the Presentation. Shapes must be Tagged first.
Hide Shapes: Tools to hide and unhide shapes (circles, textboxes, tables, etc…) throughout the Presentation. Shapes must be Tagged first.
![]() Add Hidden Tags: Adds a Hidden Tag to the selected shapes to enable the Hide Unhide functionality.
Add Hidden Tags: Adds a Hidden Tag to the selected shapes to enable the Hide Unhide functionality.
![]() Hide Unhide Shapes: Hides or Unhides Shapes with Hidden Tags throughout the Presentation.
Hide Unhide Shapes: Hides or Unhides Shapes with Hidden Tags throughout the Presentation.
![]() Remove Hidden Tags: Removes the Hidden Tags and Unhides those Shapes if Hidden throughout the Presentation.
Remove Hidden Tags: Removes the Hidden Tags and Unhides those Shapes if Hidden throughout the Presentation.
![]() Unhide All Shapes: Unhides all Shapes in the Presentation keeping any Hidden Tags assigned.
Unhide All Shapes: Unhides all Shapes in the Presentation keeping any Hidden Tags assigned.
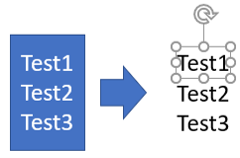
![]() Merge Text Shapes: Merges the selected shapes with text into the last selected shape and removes all but the merged result. Tables, charts and images cannot be included in the selection. The text is merged with a line feed in the order that the shapes were selected.
Merge Text Shapes: Merges the selected shapes with text into the last selected shape and removes all but the merged result. Tables, charts and images cannot be included in the selection. The text is merged with a line feed in the order that the shapes were selected.
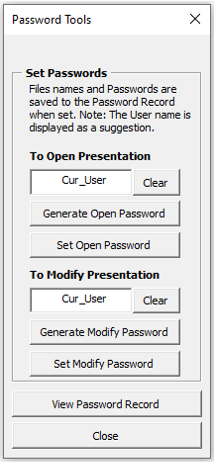
![]() Password Tools: Tools to Set, Reset and Store Presentation Password Information. If the Presentation is opened Read-Only, the Set Passwords section is disabled as you cannot change the passwords in a Read-Only state. When the form is opened, the current Windows user name is displayed in the textboxes as a password suggestion. The User can type their own password or click the Generate Password button to generate a random 8 character password. Clicking the Clear button will delete the text in the corresponding textbox. Clicking the Set Password button at this time will Reset the password to nothing. If there are characters displayed in the textbox, clicking a Set Password button will set the appropriate password, save the presentation and add the presentation location, name , date, password type and password to the Password Record. View Password Records – opens a text file listing the files and passwords set by EnP Tools. This file is located in EnP Tools folder in the User’s Documents folder – EnP_PSWs.txt
Password Tools: Tools to Set, Reset and Store Presentation Password Information. If the Presentation is opened Read-Only, the Set Passwords section is disabled as you cannot change the passwords in a Read-Only state. When the form is opened, the current Windows user name is displayed in the textboxes as a password suggestion. The User can type their own password or click the Generate Password button to generate a random 8 character password. Clicking the Clear button will delete the text in the corresponding textbox. Clicking the Set Password button at this time will Reset the password to nothing. If there are characters displayed in the textbox, clicking a Set Password button will set the appropriate password, save the presentation and add the presentation location, name , date, password type and password to the Password Record. View Password Records – opens a text file listing the files and passwords set by EnP Tools. This file is located in EnP Tools folder in the User’s Documents folder – EnP_PSWs.txt
Note: The password types are native to PowerPoint. Setting the Open password encrypts the presentation while setting a Modify password does not. It is not a security feature as it is only meant to protect from unintentional editing.
![]() Personal Tab Creator: Open a presentation which includes a Personal Tab on the Ribbon that can be used to run up to 10 user created macros.
Personal Tab Creator: Open a presentation which includes a Personal Tab on the Ribbon that can be used to run up to 10 user created macros.

Basic Steps
- Display the Visual Basic Editor (VBE)
– key Alt + F11. - Add your own code to the starter macros provided in the Custom_Macro_Module .
DO NOT change the names of the macros!
- Optional but recommended – delete the content on this slide
- Save the presentation (you can change the Name but make sure you save it as a Macro-Enable file (*.pptm ).
Optional: You can change:
- The name of the Tab (from Personal Tab)
- The name of the Group (from Personal Macros)
- The name of the Button (from Macro 1, Macro 2, etc…)
- The additional info for the macros in the “supertip”
If you do not need all 10 Buttons, you can hide them by setting the Visible Constant to False.
To create an PowerPoint Add-In:
After completing the steps above, use the SAVE AS option to save the presentation as a PowerPoint Add-in (*.ppam). Save it to the default folder provided.
To Install the Add-in (.ppam) File
- Go To File, then Options
- Select Add-Ins
- Select Add-Ins from the “Manage” drop-down and click Go
- Check the box beside the newly created Add-in and Click Close. Your Personal Tab should now be available each time you open PowerPoint. Note: if you don’t see your file name, select Add New, navigate to where you saved the file, double click it and Click Close.
![]() Restore PTC Template: Restores the default PTC Template from the original installation.
Restore PTC Template: Restores the default PTC Template from the original installation.
![]() Restore Default Template: Restores the Microsoft default template by deleting any user created Blank template located in the user’s Templates folder.
Restore Default Template: Restores the Microsoft default template by deleting any user created Blank template located in the user’s Templates folder.
![]() Shape Font Tools: Tools to change the Font settings for Shapes within the Presentation. To access the Tools, a Shape must be selected.
Shape Font Tools: Tools to change the Font settings for Shapes within the Presentation. To access the Tools, a Shape must be selected.

All Shapes: Font Styles – The initial settings are based on the selected shape. Clicking Update will change all the Presentation’s Shapes Font attributes based on the selected elements. Checking “skip Elements” skips Title, Footer, Header, Date and Slide Number Placeholder Shapes. Clear unchecks all of the check boxes.
All Shapes: Slide Master Font – Sets the Font of Title placeholders to Slide Master Title Font and all other Shapes to the Slide Master Body Font.
All Shapes: Font Size – Incrementally Increases/Decreases all Shape Font Sizes throughout the Presentation.
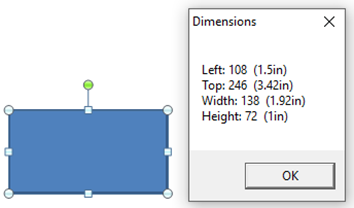
![]() Shape Stats: Provides the dimensions and position of the selected shape in both points and inches. A “point” is a unit of measurement that is equal to 1/72 of an inch.
Shape Stats: Provides the dimensions and position of the selected shape in both points and inches. A “point” is a unit of measurement that is equal to 1/72 of an inch.
![]() Set Default Template: Sets the currently selected Slide as the default template which includes the current presentation’s Slide Masters. The next time a new presentation is created or PowerPoint opened, the presentation will use the Master from the selected slide. Only the design elements included in the presentation’s Slide Masters are carried over. If you wish to include items such as images, slide backgrounds, etc… They must be included in the source presentation’s Slide Master.
Set Default Template: Sets the currently selected Slide as the default template which includes the current presentation’s Slide Masters. The next time a new presentation is created or PowerPoint opened, the presentation will use the Master from the selected slide. Only the design elements included in the presentation’s Slide Masters are carried over. If you wish to include items such as images, slide backgrounds, etc… They must be included in the source presentation’s Slide Master.
![]() Show Calculator: Opens the MS Calculator.
Show Calculator: Opens the MS Calculator.
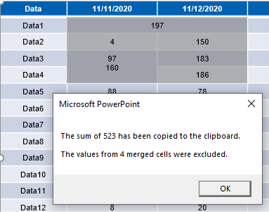
![]() Table Sum: Based on the selected Table or Table Cells, sums the Cells values, displays the result, and copies it to the clipboard. Merged cells are excluded from the result.
Table Sum: Based on the selected Table or Table Cells, sums the Cells values, displays the result, and copies it to the clipboard. Merged cells are excluded from the result.
![]() Toggle Lorem Ipsum: Toggles the selected Shapes’ text between a Lorem Ipsum string and the original text. A simple way to temporarily “hide” confidential information for printing.
Toggle Lorem Ipsum: Toggles the selected Shapes’ text between a Lorem Ipsum string and the original text. A simple way to temporarily “hide” confidential information for printing.
